Multi Load Balancing dgn PfSense
 proses load balancing
Proses instalasi dgn cd live pfsense ini sebenarnya mudah (menurut saya…). Tinggal enter yes.yes… saja. Jadi saya lewatin saja penjelasan detailnya. Hasil dr cd live ini bisa di simpan ke hardisk atau ke media lain spt usb flashdisk. Tetapi saya menyimpannya ke hardisk saja. Kalaupun ada permintaa utk setting network card dapat kita lewati dulu.
Selanjutnya setelah selesai proses instal dan di reboot akan muncul layar CLI Console spt ini
*** Welcome to pfSense 1.2-RC3-pfSense on pfsense ***
LAN* -> fxp0 -> NONE
OPT1(OPT1) -> fxp1 -> NONE
OPT2(OPT2) -> fxp2 -> NONE
WAN* -> fxp3 -> NONE
OPT3(OPT3) -> fxp4 -> NONEpfSense console setup
***********************
0) Logout (SSH only)
1) Assign Interfaces
2) Set LAN IP address
3) Reset webConfigurator password
4) Reset to factory defaults
5) Reboot system
6) Halt system
7) Ping hostShell
9) PFtop
10) Filter Logs
11) Restart webConfigurator
12) pfSense PHP shell
13) Upgrade from consoleEnter an option:
Selanjutnya proses yg dilakukan adalah :
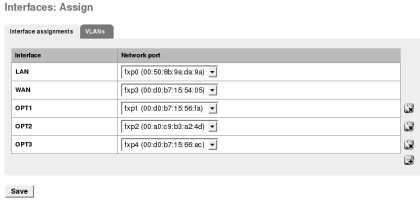
1. Melakukan setting LAN utk masuk ke WEB Admin dgn cara pilihan No. 1 (Assign Interfaces)
VLAN Capable interfaces:
fxp0 00:50:8b:9a:da:9a (up)
fxp1 00:d0:b7:15:56:fa
fxp2 00:a0:c9:b3:a2:4d
fxp3 00:d0:b7:15:54:05 (up)
fxp4 00:d0:b7:15:66:ecEnter the parent interface name for the new VLAN (or nothing if finished): fxp0
Enter the VLAN tag (1-4094): 1
Kemudian isi NIC yg terdeteksi/tertulis berikutnya spt di atas, misalnya VLAN : fpx1 atau VLAN=wl01. Atau biarkan dgn value kosong dan tekan enter.
Selanjutnya setting LAN
Enter the LAN interface name or ‘a’ for auto-detection: fxp0
Enter the WAN interface name or ‘a’ for auto-detection: ^
Utk setting WAN dpt kita lewati dulu karena dpt di setting melalui Web Console kalau LANnya sdh selesai di setting. Utk itu kita hanya biarkan dgn value kosong dan tekan enter.
2. Setting LAN IP Address. Pilih 2)Set LAN IP Address
Enter the new LAN IP address: 10.1.2.1
Subnet masks are entered as bit counts (as in CIDR notation) in pfSense.
e.g. 255.255.255.0 = 24
255.255.0.0 = 16
255.0.0.0 = 8Enter the new LAN subnet bit count: 24
Do you want to enable the DHCP server on LAN [y|n]? n
IP Address = 10.1.2.1,Subnet Mask= 24 (255.255.255.0) dan utk saya DHCP tdk di aktifkan.
Dr pengalaman saya biasanya kita akan bingung network card yg mana yg dikenali sbg LAN krn terdapat lebih dr satu NIC. Utk itu saya melakukan testing dgn mengkoneksikan secara bergantian NIC yg ada dan melakukan ping ke jaringan LAN. Pilih pd CLI console no 8 (Shell) dan lakukan ping ke PC lain di LAN. Setelah di ketahui beri tanda pada NIC tersebut.
3. Selanjutnya kita bisa setting melalui Web Console dgn mengakses alamat http://10.1.2.1 .
Username : admin
Password : pfsense (default)
4. Setting WAN’s Address utk ISP
Selanjutnya klik Interfaces -> WAN utk setting IP Address ISP 1
IP Address : 202.155.73.42/28
Gateway : 202.155.73.41
Klik Save
Selanjutnya klik Interfaces -> OPT1 utk setting IP Address ISP 2 (Speedy)
Option Enable OPT1 : ON
IP Address : 192.168.1.100
Gateway : 192.168.1.1
Klik Save
5. Setting DNS
Klik System -> General Setup
DNS1 : 202.155.0.20 (NS Indosat)
DNS2 : 202.134.0.155 (NS Telkom Speedy)
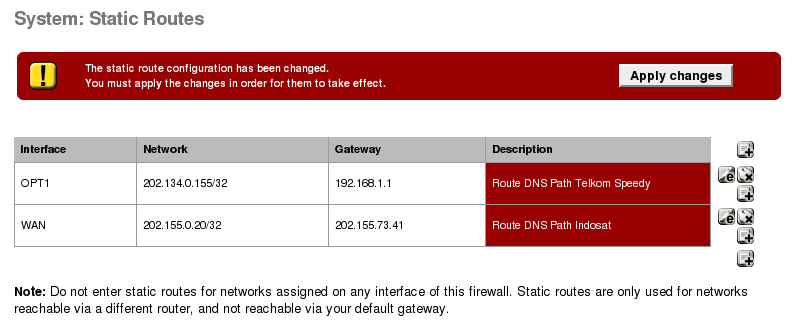
6. Setting Route DNS Path
Klik System – Static Route ->
WAN : Indosat
Interfaces : WAN
Destination Network : 202.155.0.20/32
Gateway : 202.155.73.41
OPT1 :Telkom Speedy
Interfaces : OPT1
Destination Network : 202.134.0.155/32
Gateway : 192.168.1.1
Hasilnya spt berikut :
Klik tombol Applay Changes
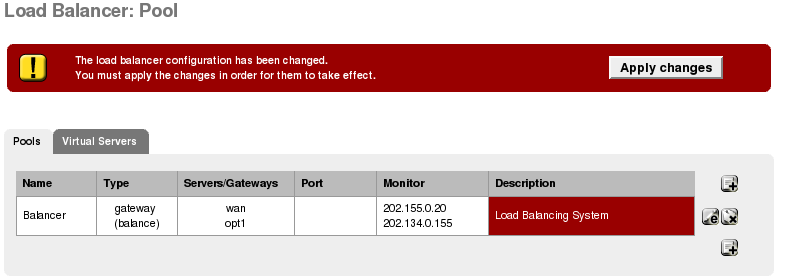
Klik Services -> Load Balancer ->
Name : Balancer
Type : Gateway
Behavior : Load Balancing
Monitor IP : Other -> misalnya isi dgn DNS : 202.155.0.20
Interfaces Name : WAN
Klik Add to poll
Lanjutkan mengisi monitor IP ISP ke 2
Monitor IP : Other -> 202.134.0.155
Interfaces Name : OPT1
Klik Add to poll
Klik Save
TIPS :
Utk memaksimalkan kerja, Monitor IP sebaiknya dicari IP Address router di seberang ISP sana dr posisi router di kantor yg tercepat dan terdekat dan tdk harus dgn IP DNS. Dapat di ketahui dgn melakukn trace route ke DNS ISP
Hasilnya spt gbr berikut
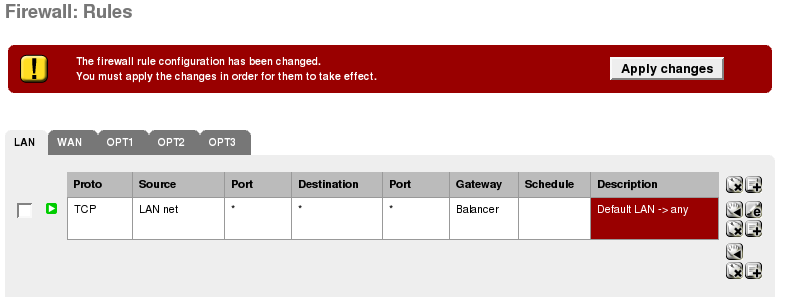
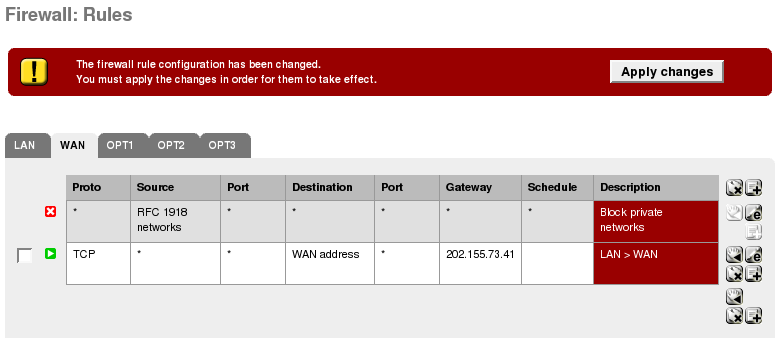
8. Setting Firewall Rules
Klik Firewall -> Rules
Selanjutnya lakukan konfigurasi sbb :
A. Setting LAN
Action : Pass
Interface : LAN
Protokol : TCP
Source : Type = LAN Subnet
Destination : Type = any
Gateway : Balancer
Klik Save & Apply Changes
B. Setting WAN -> Link Indosat
Action : Pass
Interface : WAN
Protokol : TCP
Source : Type = LAN Subnet
Destination : Type = WAN Address
Gateway : 202.155.73.41
Klik Save & Apply Changes
B. Setting OPT1 -> Link Speedy
Action : Pass
Interface : OPT1
Protokol : TCP
Source : Type = LAN Subnet
Destination : Type = OPT1 Address
Gateway : 192.168.1.1
Klik Save & Apply Changes
Dokumentasi ini hanya menjelaskan setting dasar dr Load Balancing di pfsense.
0 komentar:
Posting Komentar